|
|
|
|
|
|
|
|
|
|
|
|
|
|
|
|
|
|
|
|
|
|
|
|
|
|
|
|
|
|
|
|
|
|
|
|
 |
|
|
|
|
|
|
|
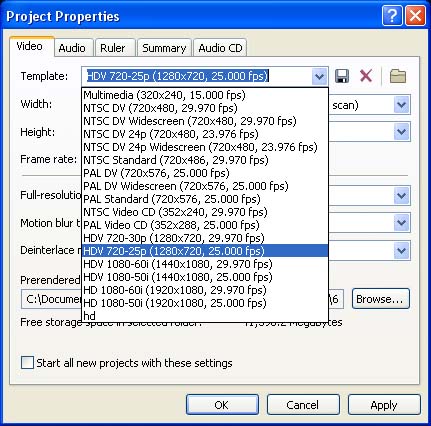
Step 1: Start Vegas 6 and click on File->Properties. The Project
Properties dialog is shown at right. In the Video tab, click on
the dropdown box for Template.
For 1280 x 720 projects, we're going to start with the HDV 720-25p template and create a new template. This doesn;t mean we're editing
HDV! We are just using the Template as a convenient starting point. |
|
|
|
|
|
|
|
 |
|
|
|
|
|
|
|
|
|
|
|
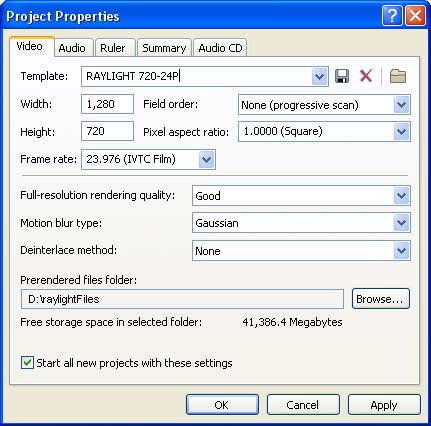
Step 2: After selecting the template, type in a new template name
(for example, RAYLIGHT 720-24P).
The following settings are OK and don't need to be changed: Width
= 1280, height = 720, field order None, Pixel aspect ratio 1.0.
- Set the frame rate to 23.976 (or 25.0 for 25P projects).
- Choose a file folder on your media drive for Prerendered files.
- In the Audio tab, set the sample rate to 48,000 Hz.
- None of the other settings need to be changed.
- Then save the template by clicking the disk drive icon.
For 1080P projects, use the HD 1080-60i template and change the
field order to None, frame rate = 23.976 (or 25.0), pixel aspect
ratio = 1.0. |
|
|
|
|
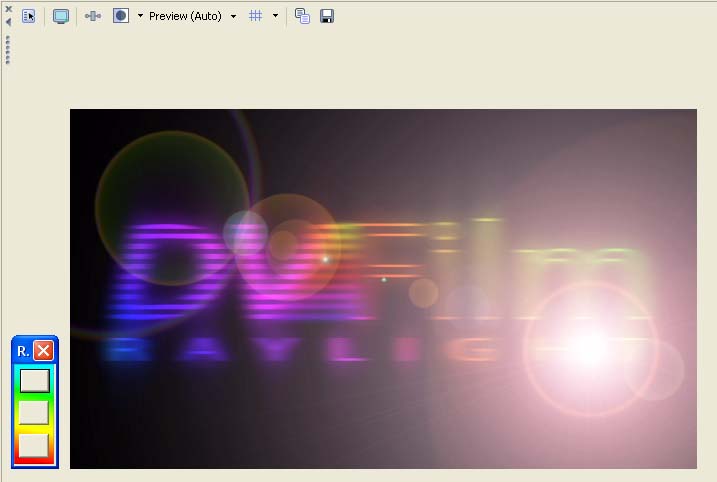
Step 3: Editing You are now ready to start editing by using the File->Import Media
selection to bring the Raylight AVI files into Vegas. When you
playback from the Vegas timeline, be sure to select the Preview
Quality setting to "Preview (Auto)" (see below):
|
|
|
|
|
|
|
|
|
|
|
|
 |
|
|
|
|
The Vegas Preview Window with Raylight Control Panel |
|
Remember to use the Raylight Control Panel described in Part 1
of this tutorial, and placed as shown above to set the quality
level during playback. If the playback is not smooth, reduce the
quality level to Yellow or Red. If you need higher resolution,
increase the quality level to Yellow or Blue.
Step 4: Export a Movie
Remember to select Raylight Blue before rendering your movie for presentation!!
DVD Movie Export a finished movie to widescreen DVD format. Click on File->Render
and select Main Concept MPEG-2 file 23.976 fps with 3:2 pulldown, widescreen, if you shot and edited at 24P. The audio should
be exported to the Dolby Digital AC-3 format. Burn the disk with
DVD Architect. For more information refer to the Sony Vegas/DVD
Architect help facility.
or HD-WM9 Export a Windows Media 9 HD movie file at 1280 x 720 or 1920
x 1080. Use 23.976 frames/sec if you shot and edited at 24P. We
recommend constant bit rate (CBR) at about 6Mbits/sec for starters,
but you can experiment with VBR (variable bit rate) or other CBR's.
This format can be burned to a DVD data disk and some DVD players
can play it back on either an HD-capable computer system or HD-capable
television. For more information refer to the Sony Vegas help
facility or Microsoft's HD-WM9 website, see here and here.
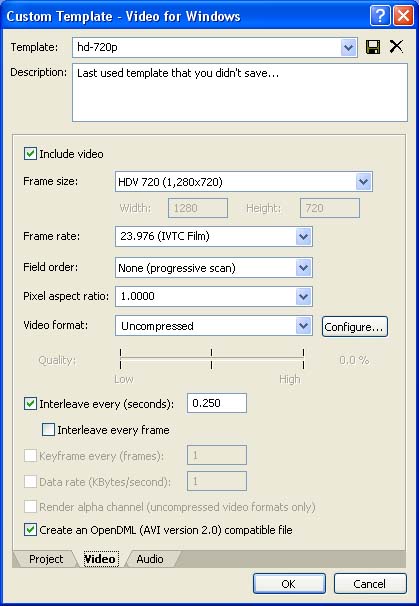
or Uncompressed AVI Export an uncompressed AVI for archive or transfer to film or
HDCAM-24P. Click on File->Render and select the Video for Windows file format. Then click on Custom Settings and select the options
shown below: |
|
|
|
|
|
|
|
|
|
|
|
 |
|
|
|
|
|
- For frame size, select HDV 1280 x 720.
- For frame rate select 23.976.
- For field order, select None (progressive scan).
- For Pixel aspect ratio, set to 1.0
- For Video format, select Uncompressed
- For Interleave, select every .250 seconds.
- Select "Create an OpenDML... file".
- In the Audio tab, select 48000 Hz sample rate, 16-bit, stereo.
The resulting AVI can then be delivered on a Firewire or USB external
hard drive to an HD post house like videopost.com for tape recording to HDCAM-24P, or to DVFilm for transfer to 35mm film.
You can also make a Raylight AVI archive movie. Substitute "DVFilm
RAYLIGHT" for the "Uncompressed" setting, and set the Raylight
quality level to Blue before rendering. The resulting AVI can
be played in the Window Media Player, as long as all your MXF
clips are present on the media drive. |
|
|
|
|
|
|
|
(Technical Detail: Note that when you make an archive in Raylight
Blue, the high quality setting, compressed versions of any scenes
with filters or effects are stored in a .rayl file located in
the Raylight output folder that you created in Part I. This .rayl
file is used by the Raylight codec to play back the Raylight AVI
of your completed movie, and it also must be present on the drive.) |
|
|
|
|
Click here to learn about settings for Adobe Premiere Pro and
Raylight
|
|
|
|
|
|
|
|
|
Click here to continue the tutorial and learn how to edit DVCPRO-50
and DV with Sony Vegas or Adobe Premiere
|
|
|
|
|
|