| Step 1
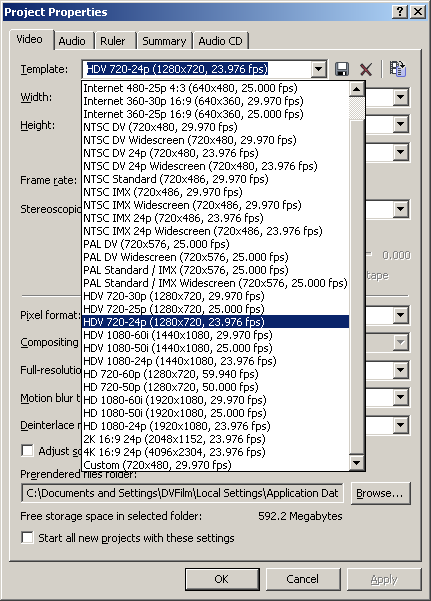
Start Vegas Pro and click on File->Properties. The Project Properties dialog is shown at right. In the Video tab, click on the dropdown box for Template. For 1280 x 720 projects, we're going to start with the HDV 720-24p template. This does not mean we are editing HDV! We are just using the Template as a convenient starting point. For 1080P projects, use the HD 1080-24p template. In the Audio tab, set the sample rate to 48,000 Hz. None of the other settings need to be changed. You can select to Start all new projects with these settings by clicking that option at the bottom of the window. |
 |
|||||||||||||||
 |
Step 2
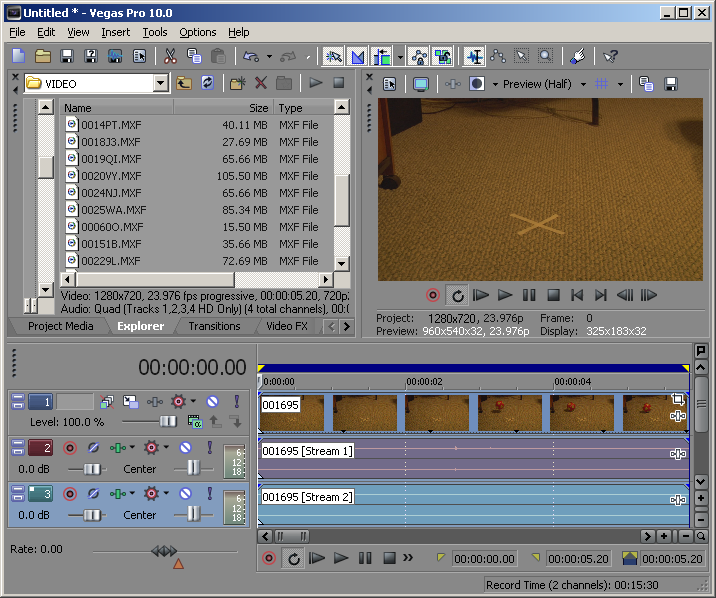
The Vegas plug-in allows you to import P2 MXF files from the P2 Cameras like the HVX200 directly into the timeline of Sony Vegas ProTM 6 or later. Import video MXF Files into Vegas Use File->Import->Media or the Vegas Explorer to locate the MXF files in the Contents/Video folder and import them into Vegas. If the Raylight plugin is installed, when you click on an MXF file, the frame size, frame rate, and other information will be displayed as shown to the left. |
|||||||||||||||
| Also if the soundtrack MXF files are located in the adjacent AUDIO folder, or in the same folder, the soundtrack settings will also be displayed as shown at above.
Raylight imports tracks 1 and 2 into a stereo track on the timeline. If you need access to tracks 3 and 4, use the "Import all 4 tracks" option in Raylight. |
||||||||||||||||
 |
||||||||||||||||
| Step 3
The MXF files may be dragged directly from the Vegas Explorer to the timeline, or from the Project Media window. Playback from MXF Files The quality of the preview window can be controlled by the Vegas preview window controls and by the Raylight Control Panel. Use the Vegas "Preview Auto" mode with the preview window set to 1/2 or 1/4 actual size. A dual-processor system with fast disk drives is recommended for using the Raylight Vegas plug-in. |
||||||||||||||||
| Step 4: Export a Movie
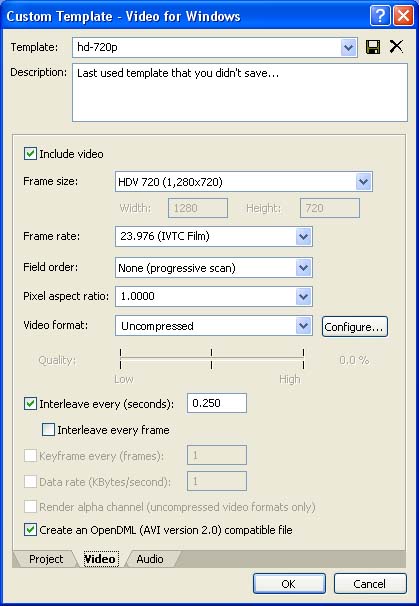
Remember to select Raylight Ultraviolet (Max Quality) before rendering your movie for presentation!! Export to P2 MXF for delivery or playback on the P2 device: See Exporting P2 MXF directly from Sony Vegas Timeline or a DVD Movie Export a finished movie to widescreen DVD format. Click on File->Render and select Main Concept MPEG-2 file 23.976 fps with 3:2 pulldown, widescreen, if you shot and edited at 24P. The audio should be exported to the Dolby Digital AC-3 format. Burn the disk with DVD Architect. For more information refer to the Sony Vegas/DVD Architect help facility. or HD-WM9 Export a Windows Media 9 HD movie file at 1280 x 720 or 1920 x 1080. Use 23.976 frames/sec if you shot and edited at 24P. We recommend constant bit rate (CBR) at about 6Mbits/sec for starters, but you can experiment with VBR (variable bit rate) or other CBR's. This format can be burned to a DVD data disk and some DVD players can play it back on either an HD-capable computer system or HD-capable television. or Uncompressed AVI Export an uncompressed AVI for archive or transfer to film or Digital Cinema Package (DCP). Click on File->Render and select the Video for Windows file format. Then click on Custom Settings and select the options shown below: |
||||||||||||||||
 |
||||||||||||||||
The resulting AVI can then be delivered on a Firewire or USB external hard drive to DVFilm for transfer to Digital Cinema Package or 35mm film. |
||||||||||||||||
| Return to Raylight Ultra 1.3 Tutorial Index | ||||||||||||||||