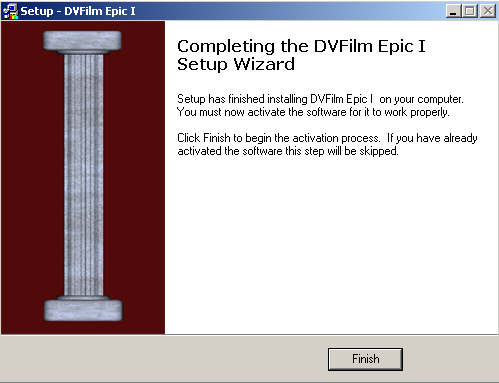
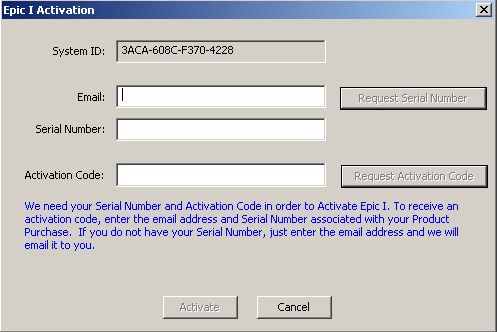
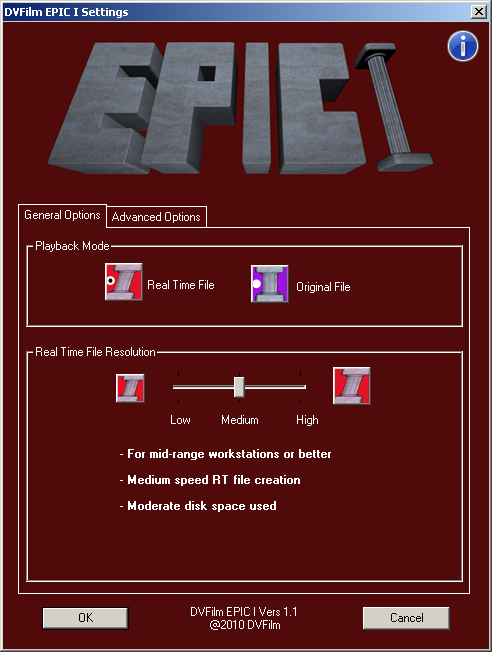
Download the Epic I Installer (EpicISetup.exe) to your desktop or work drive. In some download versions of Epic I, the archive will have unique name of randomly selected letters. Double-click on the installer program and you will see the dialog at right: After the installation is done, you will see the product activation dialog, shown at left. Fill in your email address and click 'Request Serial Number.' The serial number will be emailed to you. Fill in the serial number in the activation window and click 'Request Activation Code.' The activation code will automatically be filled in. Click 'Activate' to activate your software. Note: the demo version of Epic I does not require activation. If the computer you are activating is not on the internet, then from an internet computer, get your serial number at dvfilm.com/serial. Generate an activation code using the System ID of the computer you are installing on and your serial number at dvfilm.com/activate. General Options Open the Epic I Control Panel (at right), by clicking 'Yes' in the final install prompt or by the start menu/programs/dvfilm/EpicI/EpicIControlPanel. Playback Mode: This tells Epic I which files you want to view in Sony Vegas. Set to ULTRAVIOLET (Original File) for final rendering or stepping through individual frames of the original H.264 DSLR files at full quality. Not guaranteed real time playback. Real Time File Resolution: Use the slider to select the resolution quality of the Epic Real Time Files. Low uses the least hard disk space, creates the RT files the quickest and is for low-end workstations or better. Medium uses moderate hard disk space, creates the RT files at medium speed and is for mid-range workstations or better. High uses the most hard disk space, creates the RT files the slowest and is for high-end workstations. Advanced Options Open the Epic I Control Panel (at left), by clicking 'Yes' in the final install prompt or by the start menu/programs/dvfilm/EpicI/EpicIControlPanel and clicking on the Advanced Options tab. Epic Options: Disable/Enable Epic Plugin Button: Controls whether the Epic plugin is used by Vegas or not. To be able to export Quicktimes movies in Vegas, Epic will need to be disabled. Restart Vegas after switching. Enable Epic File Creation allows Epic to create and/or use the Epic Realtime files in Vegas. Mark Frame Red draws a red border around the frame when using Red mode. It indicates the Epic RT file is being used and appears on rendered material that was not done at best quality as a precaution. High Priority Epic File Creation lets Epic use more system resources to create RT files quicker, but this may slow down your computer. Epic Files Folder lets you choose where to store the Epic files. If left blank (default), the files are stored in an EPIC subfolder with the source files. 10-bit YUV mode yields higher quality for H.264 files. The quality difference is subtle and may not be apparent unless you have very fine gradients such as with cloudless skies or smooth walls with brightness increase during color correction. You may notice a very slight difference in contrast between 10-bit YUV and the original (RGB) mode. Also note that in 10-bit YUV mode, the Epic Column controls the Real-Time mode, the automatic mode (Vegas Preview-Half/Preview-Full) option does not work. Mark YUV mode creates a watermark in the YUV mode so you can check if it’s working. Use computer system RGB Uses higher contrast video. Do not use this mode for proejcts that are intended for DVD, Blu-ray or other video systems. Use computer RGB mode for projects that are primarily web or online content or for otherwise viewing on a computer monitor. Manual Control: Epic Column controls playback mode (Manual Mode) Vegas Preview Size controls playback mode (Automatic Mode) You can select what controls the real-time playback mode. In the Manual mode (first selection) the Epic Column control pop-up is used to switch back and forth between the Real-Time or Red mode, and the Purple, or Original File mode. In the Automatic mode (second selection), Vegas Preview Half selects the Real-time mode and rendering a full-size video output file will automatically select the Original Quality or Purple mode. The automatic mode is the most useful, however in some cases when you need to render a reduced-size video, for example a DVD (standard definition) video file from an HD camera footage, the Manual control mode msut be used to force Epic to use the high-quality mode. The "Mark Frame Red" option is highly recomended for new users to mark rendered footage with a red frame in case you did not intend to render from the real-time files. Note: previous versions of Epic allowed the Epic Red column to override the automatic option by forcing Vegas to use the real-time file regardless of the Preview-Full setting. In Release 1.1, the Epic column has no effect in Auto mode, you must enable the Manual mode in order to use the Epic Column to control quality.
Step 1: Install Vegas 9. Close Vegas if it's running.
Step 2:
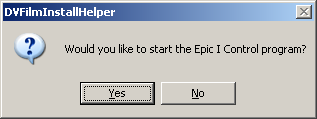
The installer will ask you if you want to start the Epic Control program. Click Yes. The Epic Control Panel will open to the General Options Tab.
![]()
Set to RED (Real Time File) for realtime playback. You will use this setting most often.
![]()
The "i" button, in the top right of the Epic Control panel, will display help information.
![]()

Render Options: